SystemRescueCD is an amazing tool that packs a myriad of admin stuff. I find myself repeatedly using it for:
- Data Transfer
- Data Rescue
- Disk Cloning

Data Transfer
This is the one that brought me to this post. It’s very easy to spin up SystemRescueCD on any machine, and you’ll get a full sshd server to connect to. From there you can download/upload to the HDDs on that machine, bypassing the Operative System.
On recent editions of SystemRescueCD, iptables starts by default, so you either stop iptables or configure the firewall to accept connections to the ssh server.
# Allow incoming and outgoing ssh
iptables -A INPUT -p tcp --dport 22 -j ACCEPT
iptables -A OUTPUT -p tcp --dport 22 -j ACCEPT

# Change root user password
passwd

# Restart sshd
systemctl sshd restart
Data Rescue:
Being the "guy that knows computers" I get around 20 HDDs per year that need saving. They range from the PCB that fried – very common on external drives with soldered USB, to SATA disks that were broken due to a fist tantrum – 2021 pandemic was prolific on those!
- ddrescue
When the hard-drive is failing, you definitely don't want it searching and seeking all over the platters. ddrescue is your own special ops team. In and out, as fast as possible. You can get it directly from gnu.org. You may also use it if you are a Windows user, just download Cygwin and take into consideration that Disk1 == /dev/sda and Cygwin expects you to use /dev/sdX notation.
On the following examples devX is the drive that needs saving, and you've mounted /mnt/goodDrive/ on another physical device.
# This would try to capture as much data as fast as possible
ddrescue /dev/devX /mnt/goodDrive/failing.img /mnt/goodDrive/failing.log
There are some other options I generally use that may eventually help someone.
ddrescue -n -a 30000 -K 100MiB /dev/devX /mnt/goodDrive/failing.img /mnt/goodDrive/failing.log

# -n (--no-scrape), jump sector on first faill
# -a (--min-read-rate), if read rate is bellow limit go to next sector
# -K (--skip-size), initial jump size for next good sector
This is generally my first choice to try and get data without stressing the disk.
On complex cases the following arguments have proven to be effective and a life-saver:
# --reverse     (-R)  recursive, try to capture from back to front
# --direct      (-d)  direct, only for use in full drives (direct access)
# --synchronous (-D)  useful when forcing the drive to remap its bad sectors
# --retrim      (-M)  mark blocks as non trimmed

# if reads are very very slow you can try and tune the cluster size
# -c 4Ki		   read in blocks of 4K (massive improvement on some HDDs)
These come on secondary passes when the recovery media is troublesome.
- testdisk
TestDisk from CGSecurity is one of the "must haves" of data recovery. It's a brilliant tool to try and restore partitions, if not using it on SystemRescueCD you may use it in both Linux and Windows. The steps I would generally take:
a) make an image of the bad disk using ddrescue
b) if that image is mountable and everything looks fine, problem solved
c) if the image has no partition, make a copy of the image
d) use testdisk to try and recover the lost partitions
# this would make testdisk work on your image file
c:\>testdisk c:\my_image_backup.img
I always suggest making a copy of the image so that if testdisk doesn't immediately work you can retry
- photoRec
PhotoRec, a companion to TestDisk, is downloaded in the same file. PhotoRec is a carver, which means it will go over the whole disk trying to find headers of known files. If it finds a known header it will download the file. Data Carvers, besides not knowing where the file originally was, have an extra problem, fragmentation! If the file is not sequential, there is absolutely no way for TestDisk to know where the missing piece is.
FF D8 FF E0 which means it's a JPEG of the type JFIF.
Unfortunatly, as you can see, the image was not sequential, thus what I got, besides a little of actual image on the top, was garbish. You can inspect any image you have and check for the initial bytes to see its header, just get a hex reader. I'm a fan of HxD.
Disk Cloning
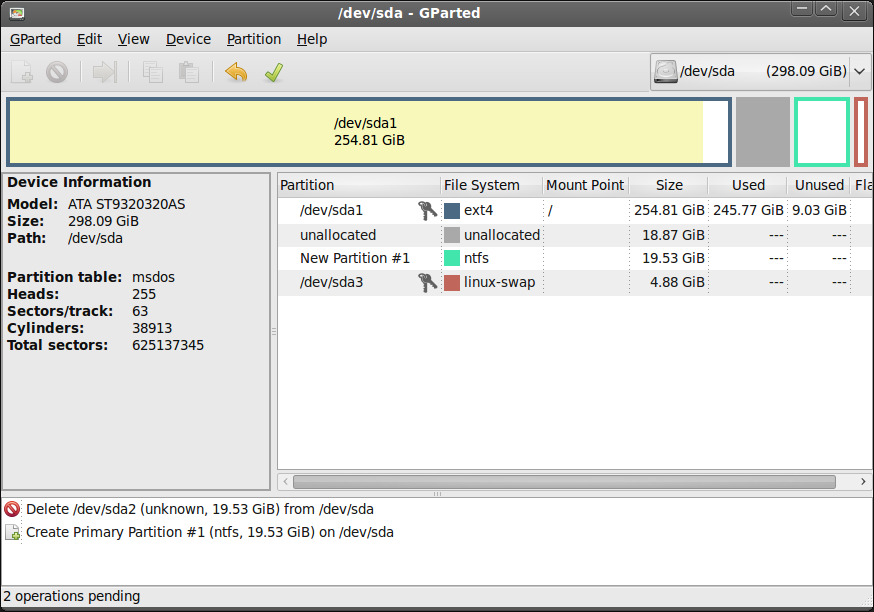
There has been a lot of switching from HDDs to SSDs. Cloning the old HDD to the new SSD using ddrescue is trivial. Sometimes the new disk is larger than the old one. When that happens you get space that does not show on the primary partition. There is nothing preventing you from formatting the extra space as a new partition, but I generally prefer to expand the existing one partition and use the full space.
- gparted
The application has a GUI and is pretty self-explanatory, so there really isn't much where you can go wrong there.
Hope it helped!
As an Amazon Associate I may earn from qualifying purchases on some links.
If you found this page helpful, please share.